Hey there, everyone! I get so many DMs and emails lately from folks asking the same thing—“How do I actually install a pilot lamp correctly?” And hey, I get it! If you’re new to working with electrical stuff, or even just swapping out a old pilot lamp for a new one, it can feel a little daunting at first. I’ve been in this game as a pilot lamp supplier for over 8 years now, and I’ve seen every possible mistake people make when installing these little guys. Some are super harmless, others can lead to way bigger issues—like flickering lights that drive you nuts or even safety hazards. Today, I’m breaking this down step by step, no fancy jargon, just real stuff I’ve picked up from selling thousands of pilot lamps and chatting with electricians, DIYers, and even small business owners who just need to get this done right. Pilot Lamp
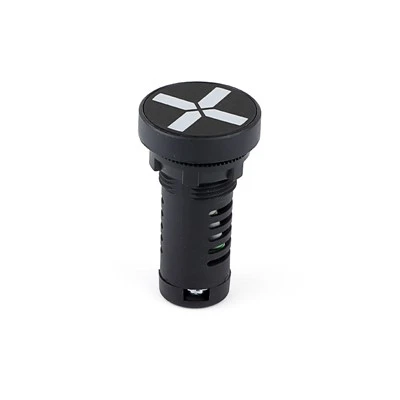
First off, let’s start with the basics you should do before you even touch a tool. This is the part that no one talks about enough, but it’s non-negotiable: turn off the power. I don’t care if you think that light switch only controls that one outlet or whatever—go to your electrical panel, flip the corresponding breaker, and then test the area with a non-contact voltage tester. Yeah, I know it feels extra, but I once had a customer who skipped this and got a tiny shock that landed him at urgent care for a night. Don’t be that guy. Also, make sure you have the right pilot lamp for the job. A lot of people grab the first lamp they see, but pilot lamps come in different voltages (like 120V, 240V, 12V, even 24V for low-voltage setups). If you put a 120V lamp in a 24V circuit, it’s gonna be super dim and not work right. Put a 24V lamp in a 120V circuit? It’ll blow instantly, and probably take out the whole circuit for that area. When I sell pilot lamps, I always ask customers what voltage they need first—no exceptions. It’s way easier to get the right one upfront than to deal with returns or mistakes later.
Next, let’s talk about the tools you’ll need. You don’t need a huge fancy toolkit for most pilot lamp installs. The essentials are: a non-contact voltage tester (like I mentioned earlier), a Phillips-head screwdriver (small one, most pilot lamps have tiny terminals), a wire stripper (or even a pair of sharp scissors if you’re in a pinch, but strippers work better), and maybe a pair of rubber gloves to be extra safe. If you’re installing a flush-mount pilot lamp (the most common type that sits in a wall or control panel), you might also need a drill with a hole saw that matches the lamp’s diameter. Pro tip: when I’m shipping out bulk pilot lamps, I always include the correct hole size specs for each type—save your customers the time of guessing, that’s my thing.
Now, let’s get into the actual installation steps, split into two main types: flush-mount (most common for walls, control panels, machinery) and surface-mount (for stuff like garage doors, outdoor signs, where you’re mounting it on top of a surface). Let’s start with flush-mount, since that’s what 90% of my customers ask about.
First, mark the spot. Hold your pilot lamp up to where you want it, trace the outline with a pencil. If you’re drilling into drywall, make sure there’s no wiring or plumbing behind that spot. Another pro move I learned: turn on your phone’s flashlight and hold it up to the wall from the other side—you can usually see faint lines from studs or pipes, that saves you from drilling into a pipe and making a mess. Drill the hole with your matching hole saw. Go slow, don’t force it, you don’t want to crack drywall or splinter wood. Once the hole is done, take the two wires that come with your pilot lamp (one is usually hot/line, one is neutral/load—wait, more on that later) and strip about ½ inch of insulation off the ends. Don’t strip too much, or the bare wire will stick out and could short out.
Now, wire connections. This is where most people mess up. Pilot lamps are simple, so there’s only two wires—no complicated three-phase stuff for residential or small commercial installs. First, identify the hot wire: that’s the one that carries power from the breaker to the lamp. In most cases, it’s black, but sometimes electricians use red or blue, so don’t rely on color alone. That’s why you tested the power earlier, right? So when you put your non-contact tester on the wires, it should only beep when it touches the hot wire. The neutral wire is usually white, and the ground is only if you’re using a grounded pilot lamp—most modern ones are, but if your lamp has a green or bare copper ground wire, that gets attached to the ground screw in the box, not the lamp’s terminals. Wait, hold on—let’s clarify that: some pilot lamps don’t have a ground wire, especially low-voltage ones. That’s totally fine, just double-check your lamp’s manual.
So for the hot and neutral: wrap each stripped wire around the corresponding terminal screw on the pilot lamp. Tighten the screw firmly, but don’t over-tighten—you can strip the screw head or the wire, which is a headache. A lot of people use wire nuts too, but honestly, the terminal screws on pilot lamps are designed to hold the wires directly, and it’s way more secure that way. Once both wires are attached, tuck them neatly into the wall box or control panel—don’t let them bunch up or get pinched, that can cause a short later.
Now, push the pilot lamp into the hole you drilled. Most flush-mount lamps have a locking ring or a retaining nut on the back—you twist that to tighten it against the wall, so the lamp doesn’t wiggle or fall out. I always tell customers not to over-tighten that ring either—if you crack the lamp’s plastic body, it’s useless, and I’ll have to send a replacement, which no one wants. Once it’s secure, flip the breaker back on and test it. The pilot lamp should turn on instantly—if it’s dim or flickering, that means you probably matched the wrong voltage, so you gotta turn the power back off and check that. If it doesn’t turn on at all, double-check the wire connections—maybe a screw came loose, or you stripped too much insulation and the wire isn’t making contact.
Okay, surface-mount pilot lamps—those are simpler for small projects, like adding a light to a tool chest or a gate. For these, you don’t have to drill a big hole, usually just a small one for the wire if needed. You mount the base of the lamp directly onto the surface with screws (the pilot lamps I sell come with tiny mounting screws for this). Wire connections are the same as flush-mount: hot to hot, neutral to neutral, ground if applicable. Then just snap the lamp head onto the base, and you’re done. Super straightforward, which is why they’re so popular for DIYers.
Wait, let’s talk about common mistakes I see all the time, because this is stuff that can be avoided easily. First, not turning off the power—like I said earlier, I’ve seen customers get shocked, and I’ve even had a pilot lamp explode because someone left power on while wiring. Second, wrong voltage—this is the number one reason for returns. When I sell a pilot lamp, I always include a spec sheet with voltage, current, and wiring diagrams, and I ask customers to send me a pic of their circuit if they’re unsure. It’s way better for both of us. Third, loose wire connections—this causes flickering, which is annoying, and can even lead to overheating if the wire isn’t making good contact. Fourth, overtightening screws or locking rings—cracked lamps or stripped screws are a waste of money. Fifth, forgetting to test after installation. Don’t just assume it works—turn the power on, walk away for a second, come back and check. I once installed a pilot lamp for a café owner, and I missed that a wire was loose, so it didn’t turn on. I went back the next day to fix it, and the owner almost lost a day of business, that’s the kind of stuff I hate.
Another thing: if you’re installing a pilot lamp for a machinery or industrial setup, there’s a few extra things to keep in mind. Industrial pilot lamps are built to handle harsher conditions—dust, moisture, vibration. So make sure you’re using an industrial-grade lamp for that, not a residential one. When wiring for machinery, you might have to run the wires through conduit to protect them from getting damaged. Also, for three-phase industrial setups, pilot lamps are a little different—they might have three wires instead of two, so you’ll want to match the phases correctly. If you’re unsure, I always tell customers to send me their equipment model number, and I can point them to the right lamp and wiring guide. That’s what being a supplier is about, right? Not just selling a product, but helping people use it right.
Now, let’s cover some troubleshooting if your pilot lamp isn’t working after installation. First, turn the power off again, duh. Check the breaker to make sure it’s actually on (sometimes they look like they’re on but aren’t). Check your wire connections—are the screws tight? Did you strip the insulation correctly? If the lamp is dim, it’s almost always a voltage mismatch—double-check your lamp’s voltage rating and your circuit’s voltage. If it’s shorting out, that means bare wire is touching the wall box or another wire—tuck the wires neatly so they don’t touch. If it flickers, that’s usually a loose connection or a bad wire, so go back and tighten all the terminals.
Wait, and a quick tip for long-term use: pilot lamps don’t last forever, but you can make them last longer by not overloading the circuit, keeping them away from moisture (unless they’re rated for outdoor use), and making sure the wiring is secure. When I sell bulk pilot lamps to businesses, I always include a little guide on maintenance too—just basic stuff like checking connections once a year to make sure nothing’s come loose.
At the end of the day, installing a pilot lamp isn’t rocket science, but it’s important to do it right. I’ve spent years making sure my pilot lamps are high-quality, easy to install, and come with all the info you need, but even the best lamp won’t work if you wire it wrong. If you’re planning an install and have questions about which pilot lamp to get, or how to wire a specific setup, feel free to reach out to connect for purchasing or any questions. I’m always here to help, because that’s what this whole thing is about—getting people the right product and the right info to get their job done right.
Oh, one last thing—if you’re a DIYer and this is your first time working with electrical stuff, take your time. Don’t rush. I’ve done hundreds of installs, and I still double-check my wire connections every single time. Safety first, always.
Smart Circuit Breaker References:
- National Electrical Code (NEC) Article 410 for Lighting Equipment Installation and Wiring Requirements
- Occupational Safety and Health Administration (OSHA) Guidelines for Electrical Safety in the Workplace
- UL Standard 1993 for Luminaires, Including Pilot Lamps, Safety Standards
Wenzhou Lanen Electrical Co., Ltd.
Wenzhou Lanen Electrical Co., Ltd. is one of the most professional pilot lamp manufacturers and suppliers in China, also supports customized service with low price. Please feel free to buy CE approved pilot lamp made in China here from our factory. Contact us for more discount information.
Address: Zhiguang Liushi Town Yueqing City Wenzhou City Zhejiang Province
E-mail: lanen@luyele.cn
WebSite: https://www.lanenelectrical.com/
